How to install Syncthing on a VPS - Step-by-step guide
Posted on - September 3, 2024 by Andy Cinquin
VPSNetcupServer installationWeb hostingServer configurationStep-by-step guideVirtual Private ServersNetcup VPSContaboContabo VPSSyncthingSyncthing VPS
Throughout this article, I will use my IP address, domain name, and username as examples. Please replace these with your own, according to your naming conventions, etc!
Installing a VPS
The first step is to obtain a VPS from your favorite hosting provider: Hostinger, Scaleway, OVH, Contabo, Netcup, Hetzner...
I have a slight preference for Netcup and Hetzner. In the following tutorial, we'll use a VPS from Netcup.
Once your account is activated and your VPS purchased, you'll receive a root password and an IP address.
Once your account is activated and your VPS purchased, you'll receive a root password and an IP address.
Open your favorite terminal: bash, Windows terminal, or whatever you prefer.
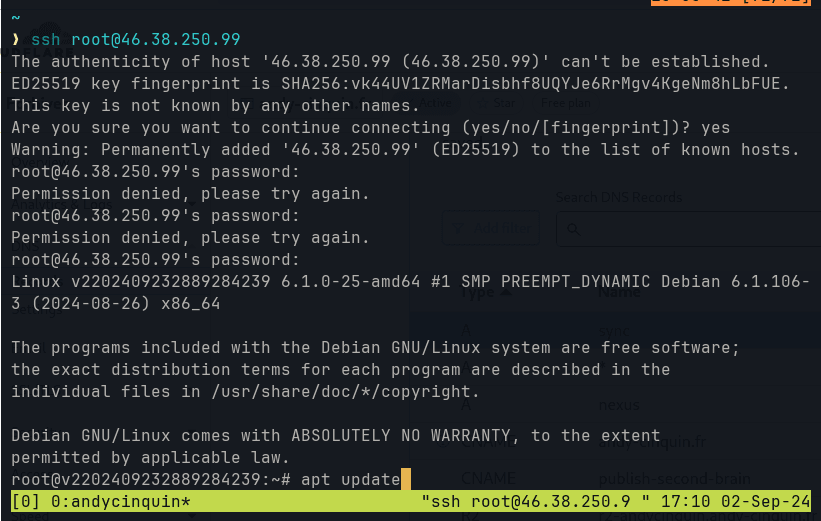
Then connect via SSH using your IP address and password.
ssh root@46.38.250.99
Optional:
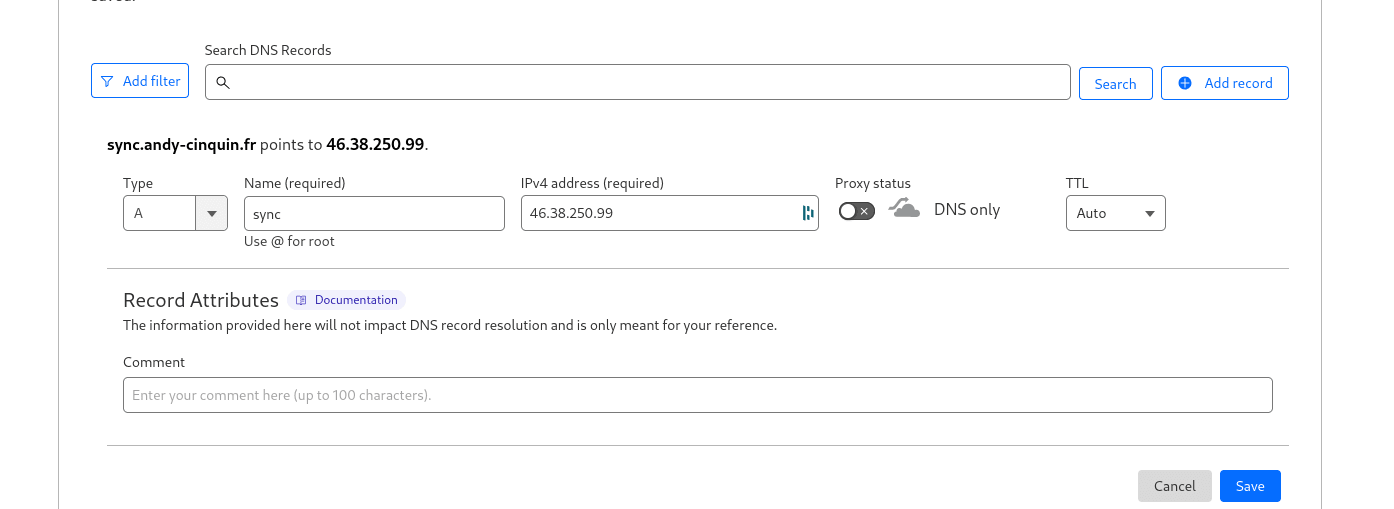
If you own a domain name, you can add a DNS address to your domain and point it to the IP address in question with an "A" record.
On Cloudflare, it looks like this:
On Cloudflare, it looks like this:
So we can simply use
ssh root@sync.andy-cinquin.fr
to avoid connecting with the IP address each time.
Once connected, we see the following message:
Update and upgrade dependencies
We execute the following two commands to install updates.
apt update && apt upgrade
And I recommend installing the following packages:
apt install sudo ufw tmux git vim fish -y
- sudo for future configuration of our user
- ufw for the firewall
- tmux for a small tool that allows multiple windows in the same terminal & session recovery
- git for managing our projects and installing other tools
- vim for a text editor (other than nano, I don't like nano)
- fish for a terminal with autocompletion and colors
If your language is not correct (optional)
This can happen (especially with Netcup)
To change the OS language:
Execute the following commands:
Execute the following commands:
-
First, generate the en_US.UTF-8 locale:
locale-gen en_US.UTF-8 -
Now, edit the locale configuration file:
nano /etc/default/localeMake sure it contains only these lines:
LANG=en_US.UTF-8
LC_ALL=en_US.UTF-8
Save and exit the file.
-
Regenerate all locales:
locale-gen --purge -
Update the locales:
update-locale LANG=en_US.UTF-8 LC_ALL=en_US.UTF-8 -
To apply these changes, restart the system:
reboot
Installing a new user and basic configuration
1. Creating a new user
- Create a new user with a home directory and fish shell
useradd andy -m -s /bin/fish
- Add the user to the sudo group
usermod -aG sudo andy
- Set a password for the new user
passwd andy
(log out)
(multiple times)
exit(multiple times)
2. SSH key configuration
Generate an SSH key (if you don't have one)
On your local machine:
ssh-keygen
Follow the instructions to save the key and set a passphrase if desired.
Add the SSH key to the server
On the server:
su - andy
- Create the .ssh directory
cd /home/andy/
mkdir .ssh
- Edit the authorized_keys file
vim /home/andy/.ssh/authorized_keys
(to save with vim, type
:x!)Copy your public key (content of
(The
Anyway, if you type "
~/.ssh/id_rsa.pub on your local machine) into this file.(The
~ corresponds to the user directory on your machine; on Windows, it will probably be something like C://users/andy/.ssh)Anyway, if you type "
cd ~/.ssh/" in your terminal on your own machine, you'll find the location you're looking for (the file is hidden, so you may need to check the box that allows you to see it on Windows/Linux)Configure permissions
cd /home/andy
chown andy:andy .ssh/ -R
chmod 700 .ssh/
chmod 600 .ssh/authorized_keys
3. SSH Configuration
Edit the SSH configuration file:
sudo vim /etc/ssh/sshd_config
Modify or add the following lines (remove the '#' if there is one in front), then save the file:
PubkeyAuthentication yes
PasswordAuthentication no
PermitRootLogin no
AuthorizedKeysFile .ssh/authorized_keys
4. UFW Firewall Configuration
sudo ufw allow 53
sudo ufw allow 443
sudo ufw allow 22
sudo ufw enable
Don't forget to add all the necessary ports for your services to function.
5. Restart SSH service
After making all these changes, restart the SSH service:
sudo systemctl restart sshd
Verification
- Open a new SSH session and verify that you can connect with your key.
- Verify that you cannot connect with a password.
- Verify that you cannot connect as root.
ssh andy@sync.andy-cinquin.fr
-> this connects me directly with the correct user and directly on my machine
Security notes
- Keep your private key secure on your local machine.
- Regularly update your system and packages.
- Monitor unsuccessful connection attempts in the logs.
Step 2. Install Syncthing and configure it
Here's the continuation of your tutorial, explaining the installation and configuration of Syncthing, as well as accessing its web interface via an SSH tunnel:
1. Installing Syncthing
Log in to your server as the andy user:
ssh andy@sync.andy-cinquin.fr
Install Syncthing:
sudo apt update
sudo apt install syncthing
2. Configuring the Syncthing service
Create a systemd service file for Syncthing:
sudo vim /etc/systemd/system/syncthing@.service
Add the following content:
[Unit]
Description=Syncthing - Open Source Continuous File Synchronization for %I
Documentation=man:syncthing(1)
After=network.target

[Service]
User=%i
ExecStart=/usr/bin/syncthing -no-browser -no-restart -logflags=0
Restart=on-failure
RestartSec=5
SuccessExitStatus=3 4
RestartForceExitStatus=3 4

[Install]
WantedBy=multi-user.target
3. Activating and starting the service
Enable the service to start automatically at system startup:
sudo systemctl enable syncthing@andy.service
Start the service:
sudo systemctl start syncthing@andy.service
Verify that the service is running correctly:
sudo systemctl status syncthing@andy.service
4. Firewall configuration
Ensure that port 8384 (Syncthing web interface) is only accessible locally:
sudo ufw allow from 127.0.0.1 to any port 8384
5. Accessing the web interface via SSH tunnel
On your local machine, create an SSH tunnel to the remote server:
ssh -L 8385:localhost:8384 andy@sync.andy-cinquin.fr
This command creates a tunnel from port 8385 on your local machine to port 8384 on the remote server.
6. Accessing the web interface
Open your web browser and access the following URL:
http://localhost:8385
You should now see the Syncthing web interface.
7. Initial Syncthing configuration
In the web interface:
- Set a password for the web interface in "Settings" > "GUI".
- Configure folders to synchronize by clicking on "Add Folder".
- To connect other devices, use "Add Remote Device" and exchange device IDs.
8. Closing the SSH tunnel
When you're done, you can close the SSH tunnel by pressing Ctrl+C in the terminal where you launched the SSH command, or by using:
pkill -f "ssh -L 8385:localhost:8384"
Important notes
-
Make sure Syncthing only listens on localhost for better security. Check the configuration file (
~/.config/syncthing/config.xml) and ensure that the<gui>section contains<address>127.0.0.1:8384</address>. -
For regular use, you can create an alias in your local
.bashrcor.zshrcfile:alias syncthing-remote='ssh -L 8385:localhost:8384 andy@sync.andy-cinquin.fr'This way, you can simply type
syncthing-remoteto open the SSH tunnel.
Alternative advice
Here are some best practices and recommended configurations for Syncthing, as well as important information on configuring different devices:
- Using introducers:
- An introducer is a device that helps establish a connection between two other devices that cannot connect directly.
- Use introducers when:
- Your devices are behind NATs or restrictive firewalls.
- You have a device that's always online (like a server) that can facilitate connections.
- Configure your VPS server as an introducer for your other devices.
- Don't use more introducers than necessary to avoid complexity.
- Folder management:
- Use absolute paths for shared folders.
- Avoid synchronizing system folders or application directories.
- Use descriptive and consistent folder names across all devices.
- Consider using read-only folders for less secure devices.
- File versions:
- Enable file versioning to be able to recover previous versions if needed.
- Choose between simple versioning, staggered versioning, or external versioning according to your needs.
- Ignoring files:
- Use ignore patterns to exclude temporary files, caches, and system files.
- Create a .stignore file in each synchronized folder for fine-grained exclusion management.
- Compression:
- Enable compression for slow connections or large files.
- Disable it if all your devices are on a fast local network.
- Bandwidth limits:
- Configure bandwidth limits to avoid saturating your connection.
- Adjust these limits according to your needs and your Internet connection.
- Folder scanning:
- Adjust the scan interval based on the frequency of changes in your folders.
- Use the file system notification function (fsnotify) when possible.
- Security:
- Use HTTPS for Syncthing's web interface.
- Enable authentication for the web interface.
- Use strong passwords for all devices.
- Limit web interface access to localhost and use an SSH tunnel to access it remotely.
- Device configuration:
- Give descriptive names to your devices for easy identification.
- Use labels to group devices by function or location.
- Relays and discovery:
- Use global relays only if necessary for connection.
- Configure local discovery if all your devices are on the same network.
- Notifications:
- Configure notifications to be alerted of important changes or synchronization issues.
- Configuration backup:
- Regularly back up your Syncthing configuration (.config/syncthing folder).
- Updates:
- Keep Syncthing up to date on all your devices to benefit from the latest features and security fixes.
- Monitoring:
- Use the "Out of Sync Items" tab to identify and resolve synchronization issues.
- Regularly check logs to detect potential problems.
By applying these best practices, you'll optimize the use of Syncthing while maintaining a good level of security and performance. Remember to adapt these recommendations to your specific use case.
🚀 Thanks for reading!
If you enjoyed this article, feel free to share it around.
💡 Got an idea? Let's talk !☕